Lesson Four: Centering as Technique
If you know me, if you’ve ever had a conversation with me, when you heard someone say the word logic in conjunction with my name, you would shake your head. Anyone, myself included, would never think of me as a logical person. I had to find my own explanations in an effort to explain to myself, and now to students, why I’m doing what I’m doing.
Centering the clay begins with us. I know that today many potters don’t think wedging the clay is even necessary. We buy our clay pugged and deaired. We don’t need to get rid of air pockets or add other ingredients. Why spend the energy to wedge? While it helps the clay, wedging isn’t just about the clay. It is about us, and it’s the beginning of that conversation with the clay. Wedging allows us to meet for the first time. How stiff or soft is the clay? Is it shy or bold? Is it cold or warm? Does your mind wander or are you listening to the clay with all that you are?
Pugged clay will be slightly dryer on the outer edges and a little softer in the center and one of the reasons I like to wedge is about making sure I have even moisture content. But another reason is that many potters believe, as I do, that the clay is alive. It has an energy. It is an active partner. Wedging warms up the clay molecules. It wakes up the clay and begins the centering process. It is also about getting to know, becoming intimate if you will, with the particular piece of clay you are preparing.
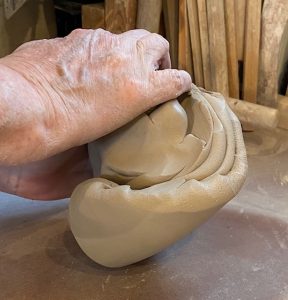
Wedging also is a time of transition for me. After wedging, I move from the wedging table ready to experience throwing on the wheel. The time spent at the wedging table is as much for me as it is for the clay. We are both preparing for the next step in the process.
Centering is one of the things in my world that lives in every part of my experience. It is pure instinct; it is physics; it is body memory; it is understanding. Over the years I have talked myself through the centering process on the wheel and in my life. And as a teacher, I needed those words to explain how to center the clay to students.
I believe centering is a concept. It isn’t an absolute. I’m sure there are many potters that would disagree with this statement, but this is one thing that has stayed true for me for decades. Some of the most beautiful pots in the world are not completely centered, maybe not centered at all. They dance on the center. They swing on the center. Some pots that are centered as if they have been programmed by a machine are left lifeless and lose their magic.
Not always, never always, but centering or not centering doesn’t make or ruin a good pot. It is in the hands and heart of the potter. You can’t fake it. How much life do we share with the clay? How honest are we? How do we capture the moment the pot is being made? I often think of potters as the poets of the graphic arts. We capture a single moment, and in that moment, we must be honest and tell the whole truth, share all that we are, good and bad and all that the clay is. We must open up and give back all that the moment holds. Like creating a timeless poem, giving life to a pot takes all of you. The potter and the pot together capture the moment and the fired piece will travel through time holding the secret of that exact moment, that exact time and place and all the love a potter has given and received from the clay when the piece was created.
As we begin work each day we make a choice to bring our best to the experience. When I put the clay on the wheel head, I have to reconnect with my body. My shoulders drop, I make myself comfortable and find the best posture to keep myself stable and strong. I like my back straight, bending from the hip to lean forward and find the best position I can for the size of clay I am centering.
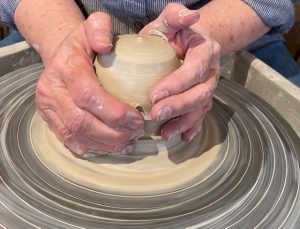
I’m right-handed. My wheel goes counterclockwise. I’m centering by sending all that I am and all that I know down my left arm into my hand. My hand meets the clay as it turns counterclockwise and I keep my left hand stable and strong. Firmly, but without force, my left hand rotates forward and as the clay rises my body leans forward just a little, hand steady, firmly leaning into the clay and a cone begins to form. My right hand is on the top of the mound at first and resists the upward motion just enough to move and smooth the clay. I move my right hand to the bottom of the right side of the clay, and I don’t move the clay up until the bottom is smooth and begins guiding me to center. I let my left hand move the clay up a bit more by leaning into the place on the clay that comes just around the curve. I feel the strength and power of the clay and the force of the wheel throwing the clay outward. If you can catch the clay at that point of resistance as it comes around the curve you can move it up with the least amount of effort. I call this the potter’s point.
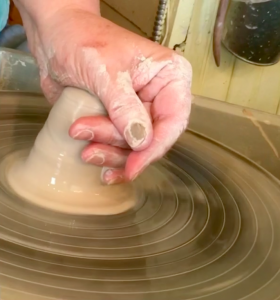
I drop my right hand to the right side of the clay and find my second potter’s point, the place where the clay is just coming around the curve into my right palm. With my middle finger I pull back at that second potter’s point, and with those two points of pressure the clay moves up like magic. My left hand does all the heavy work because my palm and hand can push forward into the curve but my right hand will help tremendously by pulling back with the strength of a single finger. With little or no effort, the clay shoots up from the center into a beautiful cone between my two hands. Once up I can see by the unevenness of the top of the cone how much I have moved the clay. It is now ready for the descent.
I place my left palm over the edge of the top of the cone, my thumb across the center of the clay, and the cone is pushed just slightly forward away from center. The clay becomes round and smooth in my palm. I lean forward just a little. The wheel turns and my right hand comes up over the top of the cone and connects with my left hand, pushing from the top with downward pressure, but without force. The clay moves down and widens. With my left palm cupping over the edge of the clay holding steady, still, and strong, I bring the clay on center with each rotation of the wheel. Coordinating with the wheel speed I bring the clay down a little, maybe just a quarter of a pound at a time with each rotation of the wheel, not going down until the clay in my left palm is centered. Pushing down a bit more I continue to center, little by little keeping the center of the cone crowning up without getting a divot.
The gentle pushing of the cone forward away from center forces the clay to try and return to center. With my right hand pushing the clay down and my left hand catching until my hands touch the wheel head the clay is centered to the core. I like to tuck both my hands in as they meet the wheel head centering that very last bit of clay on the bottom of the mound. I can repeat again and again until the entire mound of clay is centered to my satisfaction and never have to overpower the clay or strain my body.
By finding the potter’s point and sending my energy, not force, down my left arm and hand I can center large amounts of clay, 25 lbs. or more, with very little muscle effort. I have never allowed myself to endure or feel pain or discomfort in my body as I work. If something doesn’t feel right, I stop, realign my body and begin again. This isn’t a case of no pain no gain. It is learning the best way our body can work with the amount of clay we want to center without struggle, pain or exhaustion. I knew from the beginning I was in for a lifetime in clay and I didn’t want to suffer physically to do the work I chose. By following these few rules, I have been lucky not to feel pain at any time during my clay process. As I have aged, I have found newer ways to stay safe and healthy in the studio, and my body appreciates not being stressed. As a result, I have been able to work joyfully for more than 4 decades at the wheel. Hand building at my table or throwing pots on the wheel, decorating, glazing, loading and firing all types of kilns have all given me purpose and fulfillment throughout my long journey and love affair with clay.

Leave A Comment